Shooting Video With Canon XA10 (D-47, 48, 49) in Media Office
If you've used the Canon Vixia in Video 1, this camera follows a lot of the same logic, Built in and removeable memory, touch screen controls and HD to SD internal conversion. Menu structures are similar as is the touch screen interface. The camera also shoots in AVCHD format. The big difference: A higher quality image sensor, larger 64GB internal memory and dual XLR microphone inputs, just to scratch the surface!
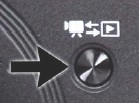
Toggle camera/ playback button on inner part of unit.
Then:
On back rear right of unit select one of the modes
Auto-Camera does everything automatically
M-Allows access to menus etc for manual adjustment of focus, exposure and other things
Cinema-puts camera in 24p mode but it is still manual
This camera shoots natively in High Definition but in 2 different flavors depending on the data rate that you choose.
In MXP and FXP mode= 1920 X1080
In XP, SP, LP mode= 1440X1080
To Set Video Quality/ Data Rate
1-on touch- screen select "func" and then "menu" then the middle tab (film strip) then scroll down and select "recording mode"
2-You will have 4 choices MXP is the highest quality, LP is the lowest. MXP mode can still shoot 5 hours of video on the internal memory card and 1 hour, 25 minutes on the 16gb SD card
3-T0 slect the desired mode by pressing it on-screen then press the X to save the change.
Manual Focus
On touch screen select "function" then "focus" then "MF" . use focus ring. You can also toggle between AF/ MF wuth a button on left side of screen.
Manual Exposure
1-In manual or cinema mode go to touch screen and select "func" then "Rec. Programs" then "Manual Exposure"Then choose the button for the function that you want to adjust.
2-"F" is aperture, "1/60" is shutter speed and "3db" is gain. use the adjustment arrow at the bottom of the screen to set the desired value.
White Balance
on touch screen select "func" then "white balance" then desired white balance mode
The strength of this camera is the ability to connect 2 microphones via high quality, 3 pin XLR connection and control the mic levels separately.
Lets have a look at the mic controls:
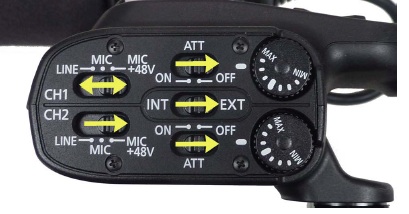
Ch1s 1 and 2 can be switched to "mic", if using dynamic mics that don't require a power source or "mic +48v" (phantom power) if you are using a mic that requires batter power. +48v/ phantom should only be used when you have battery powered mics with dead batteries. what you are doing is using the camera to power the mics.
"ATT" is attenuation it is a coarse level adjustment that should only be used in extremely loud situations.
Slide the "Int"/ "Ext" toggle towards "Ext" to connect external mics.
At the very end of the mic terminals are the individual level dials for each channel. Use these to set mic levels.
Setting Mic levels
1-Connect the microphone to one of the 3 hole XLR jacks on the camera
2-Set the "INT" "EXT" SWITCH TO (external)
On the touch screen you should see the audio level meter
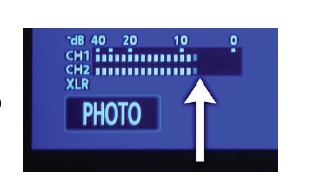
Use the mic level dial on the microphone terminal to set the audio level. Your peak should reside between -10 and 0 indicated by the arrow
If you have two mics connected and only see a signal for one, make sure to check the "XLR rec channel" settings in the camera.
To do this :
1-press onscreen "func" button
2-press onscreen "menu" button
3-select camera tab
4-scroll down to "XLR Rec Channel" and select "ch1. ch1" NOT "ch1/2 , ch1/ch2"
Playback
1-Toggle the camera playback switch to playback
2-On the touch screen press on the thumbnail of the clip that you want to play
Selecting Recording Memory
This camera has a 64gb internal memory as well as SD card slots. To choose between internal and external memory:
1-On touch screen press "FUNC" then "MENU"
2-select center (film strip) tab
3-Scroll down to "Rec Media For Movies"
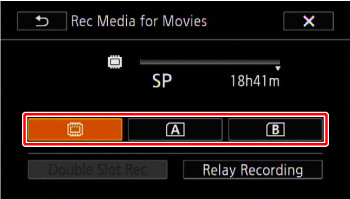
4-Select the desired recroding media. The square icon to the left is the internal memory, while A and B are for the SD cards.
File Transfer
1-connect camera to computer via usb jack or insert sd card into card slot.
2- to view contents of disc, right click on its icon and select "view contents" from contextual menu
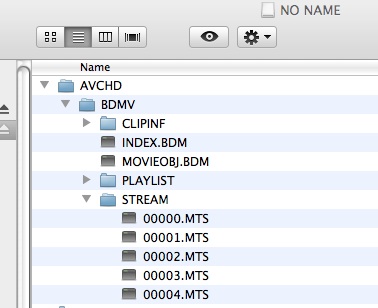
3-Your video files have the suffix of .mts. They can be found in the AVCHD/ BDMV/ STREAM directory.
4-Copy these .MTS files to your hard drive.
The .MTS files can be imported directly into Adobe Premiere or you can do a "log and transfer" in Final Cut Pro (file menu> log and transfer).