Shooting Video With Sony HDR CX580V (D-50 in Media Office )
This full featured camcorder shoots natively in High Def in the AVCHD format similar to the Canoon XA10s and Vixias. It has a resolution of 1920 X 1080 at both 60p and 24p. It also has a built in wide angle lens with a 29.98mm focal length, 32 GB of internal memory, and an 8gb SD card and a built in light for those situations that don't allow for a lighting kit. One of the more exotic features of this camera is its ability to shoot in 5.1 surround.
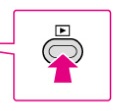
Toggle camera/ playback button on inner part of unit.
You can switch between still camera mode and video mode with the "mode" switch right above the battery.
This camera shoots natively in High Definition but in 2 different flavors depending on the image quality that you choose.
In FX and FH mode= 1920 X1080
In HQ and LP mode= 1440X1080
With the 32GB internal memory
FX=2 hrs: 47 min, FH=3hrs 47 min, HQ=6hrs, 47 min
To Set Video Quality/ Data Rate
1-on touch- screen select "menu" and then "Image Quality/ Size"
2-Press "rec mode" to get to the four quality settings listed above.
3-click on "ok" to save the change.
To Set Frame Rate
1- -on touch- screen select "menu" and then "Image Quality/ Size"
2-press "frame rate" to get to your three choices: 60i, 24p and 60p. The p-modes are the most desirable. 24p is the closest to film.
Manual Focus
On touch screen select "menu" then "camera/ mic" . Scroll down to "focus" and select "manual". On touch screen select the left arrow to focus on a nearby subject and the right arrow to focus on a far away subject.
Manual Exposure
On touch screen select "menu" then "camera/ mic" . Scroll down to "exposure" and select "manual". On touch screen select the left minus sign to darken the image the right plus sign to increase the brightness
White Balance
On touch screen select "menu" then "camera/ mic" . Scroll down and click on "white balance" you'll have three modes to select from at the bottom of the screen: "auto" , "outdoor , "indoor" and "one touch" ![]() . To use the one touch feature, zoom in on a white surface and press on the icon.
. To use the one touch feature, zoom in on a white surface and press on the icon.
Using and external microphone and setting microphone levels
1-Connect the microphone to the red mini jack on the side of the camera. It is automatically detected
2-To set levels, on touch screen select "menu" then "camera/ mic". Scroll down to microphone and select "Micref Level". You then have the choice to select "normal" or "low".
Once back in camera mode you should see the audio level meter on the touch screen. ALWAYS WEAR HEADPHONES
Playback
1-Toggle the camera playback switch to playback
2-On the touch screen press on the thumbnail of the clip that you wnat to play
Selecting Recording Memory
This camera has a 32gb internal memory as well as SD card slots. To choose between internal and external memory:
1-On touch screen press "MENU" and "SETUP"
2-select "media select". Choose "Int. Memory" or "Memory Card"
3-Scroll down to "Rec Media For Movies"
File Transfer
1-connect camera to computer via usb jack on left side of unit
2- to view contents of disc, right click on its icon and select "view contents" from contextual menu
2-power camera on. select "usb connect" . Your video files have the suffix of .mts. To view contents of disc, right click on its icon and select "view contents" from contextual menu. They can be found in the NO NAME/ AVCHD/ BDMV/ STREAM directory. "NO NAME" is the internal memory. "PM HOME" is the sd card.
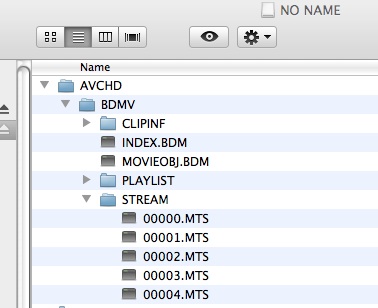
The .MTS files can be imported directly into Adobe Premiere or you can do a "log and transfer" in Final Cut Pro (file menu> log and transfer).