This is a basic camera that shoots both video and photos.
BASIC FUNCTIONS
Switching Between Camcorder Mode and View/ Playback Mode
1) open up camera flip screen. This turns the unit on.
2)use the button with the arrow icon to toggle between the 2 modes
Selecting Shooting Mode
1) press joystick to the left of flip screen
2) scroll to "shooting mode", press joystick again
3) select "movie" or "photo "
Settings For Shooting Video
For the most part, auto settings will be sufficient for your projects, but here are a few things to take note of:
To access camera settings, press joystick and scroll to "camera/ mic" from here you can scroll to a variety of settings
1-White Balance assures color accuracy by pressing the joystick , you will have a few choices that you can use the joystic to select:
"auto wb" and there are also settings for indoor and outdoor light.
2-Exposure sets the brightness/ darkness of the image. Use the joystick to select either "auto" or "manual".
In manual mode you can use the + and - icons to brighten or darken the image.
3-Focus is pretty self explanatory. Use the joystick to select either "auto" or "manual".
In manual mode you can use the head and mountain icons to focus the image.
4-Microphone/ Audio Level and Settings. Use the joystick to select the microphone icon.
There are three settings: "Blt in Zoom mic" follows the zoom lens. "Wind Noise Reduction" attenuates wind interference. "MicRef Level" provides you with two
setting for your mic level "normal" and "low".
Image Quality/ Size
Use the joystick to scroll over to and select this icon
1-Rec Mode sets the overall image quality. Use "FH" (High Quality) which is 17mbps. It's a flexible format that still allows you to shoot still images, if need be.
2-Frame Rate sets the number of frames/ second. "60i" is a good, general purpose setting. "60p" is superior for video displayed on a computer.
3-File Format-Use "AVCHD"
Moving Files to the Computer
1-disconnect the power plug from the dual use power cable and connect it to the built in usb cable which can be found at the right side of the camera.
2-connect the other end to the usb jack on your computer. Open a new finder window and take note of the following directories.
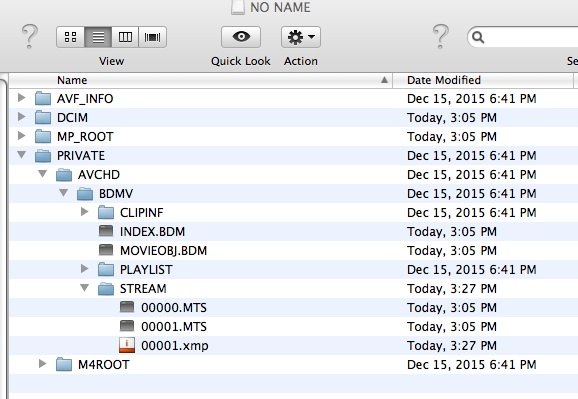
To Access full HD .MTS video files (1920X 1080) Go to: No Name/ Private/ AVCHD/ BDMV/ Stream/ and locate your .MTS files. Drag those to your hard drive to import into Adobe Premiere.
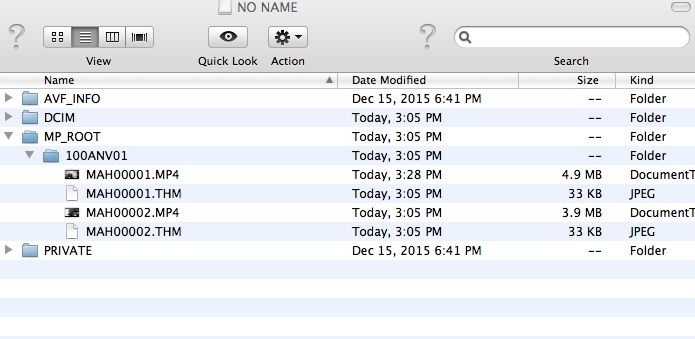
To Access lower quality .MP4 video files (1280 X 720) Go to: No Name/ MP_Root/ 100 ANV01 and locate your .MP4 files. Drag those to your hard drive to import into Adobe Premiere.
Properly eject the storage devices from the desktop before disconnecting.
For a full online manual, go here