Canon Vixia HFR600 (b-33, b-34 in Media Office video1 digicams)
The Canon Vixia HFR600 shoots with flash memory, natively in high definition(HD). It generates .mts files, which can be directly imported into Adobe Premiere.
The flip out screen is a fully functional touch screen.
Switching Between Camcorder Mode and View/ Playback Mode
1) open up camera flip screen
2)use the button with the arrow icon to toggle between the 2 modes
Getting to Camera Functions
1) press onscreen home icon
2) scroll to "shooting mode"
3) select either 'P' or 'Cinema' mode. These have the most options for configuration
Setting White Balance
1) press on-screen camera icon
2) scroll through available options
3) press onscreen "WB" button , there will be 4 options to select
a) "AWB" is auto white balance
b) sun icon is for shooting in daylight
c) lightbulb icon is for shooting indoors
d) ![]() is manual or custom white balance, which is highly recommended
is manual or custom white balance, which is highly recommended
To set white balance manually:
-select ![]() icon
icon
-press the onscreen "set WB" button, zoom in on white surface in prevailing lighting condiitons
-camera will be white balanced when ![]() icon stops blinking.
icon stops blinking.
Manual Focus
1) in camcorder mode press onscreen camera icon.
2) scroll to onscreen "focus" button, then the onscreen "MF" button (manual focus)
3) use the 2 onscreen buttons (mountain/ person icons) to set focus.
Manual Exposure
1) repeat step 1 above, scroll to onscreen "exposure" button.
2) press onscreen "exposure" button
3) press onscreen "M" button
4) use onscreen arrows to set the exposure
Setting Audio Levels
1) repeat step 1 above (focus)
2) scroll through the onscreen menu until you get to thee "mic level" onscreen button.
3) slect "manual" or "automatic"
4) for "manual" use the onscreen arrows to set the audio levels
Other Functions:
Setting Image Quality and Format
1-Press onscreen Home button
2-Scroll to "recording setup"
3-Press "movie setup" and make sure that "AVCHD" is selected
4-Go back to "recording setup" and select "video quality". These are your settings:
60p= highest quality
MXP=medium quality
FXP=standard quality
Playing Back Video In-Camera
1) go to playback mode
2) scroll onscreen to select desired clip
3) press the onscreen thumbnail to play the clip
Moving Files to the Computer
1-connect camera to computer via usb jack or insert sd card into card slot.
2- to view contents of disc, right click on its icon and select "view contents" from contextual menu
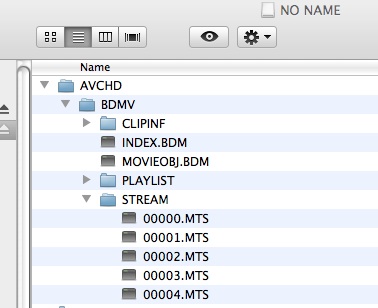
3-Your video files have the suffix of .mts. They can be found in the AVCHD/ BDMV/ STREAM directory.
4-Copy these .MTS files to your hard drive.
The .MTS files can be imported directly into Adobe Premiere or you can do a "log and transfer" in Final Cut Pro (file menu> log and transfer).