Shooting Video with the Sony A7iii
(D-52-DD to, D-53-DD) in Media Office
The Sony A7iii shoots to an SD card. It shoots in high definition as well as 4K.
Switching to Camcorder Mode
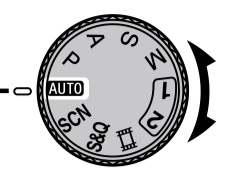
1) set the dial at the top of the camera to movie mode by lining the film icon up with the indicator line
Setting White Balance
1) toggle to camcorder mode
2) press the 'menu' button on the left rearside of the camera . Use the joy stick to the right of the view screen to select the 'camera 1 ' menu. Keep pushing joystick to right until you get to page 12 of the settings.
3) use the joystick to select "white balance" onscreen . The white balance pre-sets will appear on the left side of the screen. These include "automatic""daylight", "shade", "cloudy" etc. Press the appropriate icon on the view screen.
4) to manually set white balance, select the "custom setup" icon ( ![]() )
)
5) Switch the dial to manual mode, scroll down to 'set' in the white balance menu. Take a photograph of a white surface under the lighting that you will be using by pressing in the joystick or center button. Make sure that it fills the screen.
6) Go back to camcorder mode. Press the "fn" button. Scroll to the white balance item on the screen and select your custom setting.
Focus Modes
To access the camera's focus modes press the 'menu' button on the left rearside of the camera . Use the joy stick to the right of the view screen to select the 'camera 1 ' menu. Keep pushing joystick to right until you get to page 5 of the settings.
At the top of page 5, you will see "focus mode". Press the joystick and scroll to select the desired mode. These modes include:
MF (manual focus) In this mode, you use the ring on the lens to adjust focus.
AFC ( continuous auto focus) In this mode, you press the shutter button halfway to focus the camera
Exposure
1) Put camera in video mode.
2) To choose exposure mode, press 'fn' button, use joystick to scroll to and select desired exposure mode.
3) For manual exposure, select "M" and use the exposure dial at the top right portion of the camera to set exposure
Other exposre modes available include "P" for automatic aperture and shutter speed, "A" for aperture priority and "S" for shutter priority
Setting Video Resolution and Format
This camera shoots in high definition and 4K at a variety of frame rates.
1-Press the menu button, use joystick to scroll to camera 2 menu. The first 3 pages Move 1. 2, 3 are video specific settings.
2-Scroll down to " file format" and select either XAVC S HD for high definition or XAVC S 4K for 4K
3- to set frame rate and bitrate scroll down to 'record setting' and select desired frame and bitrate.
For example: When XAVC S HD is selected, '24p 50M' means that you are shooting 24 frames per second with a 50 MBPS bitrate.
Frame rates range from 24 to 120. When XAVC S 4K
is selected '24p 100M' means that you are shooting 24 frames per second with a 100MPS bitrate.
in 4k mode, frame rates range fom 24 to 30.
Choosing Media Memory
The A7 comes with 2 SD card slots. To choose which slot to use
1-press "menu" button
2-Use joystick to
select camera 1 menu and to scroll to page 3 of the menu
3-Click on "select media" and select either slot 1 or slot 2
Setting Audio Levels
In camcorder mode, press "menu" go to camera 2 menu/ movie 2
1-scroll down to " audio rec level" use the dial on the right , rear, top of the camera to set the recording level.
Make sure that "audio recording" is set to on
Playing Back Video In-Camera
1) press the > button on the right side of the view screen
2) use the joystick to select the desired clip
3) press the joystick to play the clip to play back the clip
Moving Video Files to the Computer
1) Turn off camera. Insert SD card into computer or card reader
2) Select the SD card in the finder. Go to the PRIVATE folder and then the M4ROOT folder and find your video files
3) Drag the desired files to your hard drive.
